Best Crispy Chicken Wings Without Deep Frying
Not metaphorically I mean the smoke alarm went off, my husband walked into the kitchen with a confused look, and I was standing there holding a tray of sad, rubbery chicken wings that somehow managed to be both burnt on the outside and undercooked inside.
That was three attempts ago.
After testing this recipe using three completely different methods high heat only, baking powder overnight, and the wire rack trick I finally landed on the one combination that gives you genuinely crispy chicken wings without a deep fryer. Not “pretty good for baked” crispy. Actually crispy. The kind where the skin shatters when you bite into it.
Here’s exactly what worked.
Why Most Baked Wings Fail (And What to Do Instead):
The problem isn’t your oven. It’s moisture.
Chicken skin is mostly water and collagen. When you throw wings straight onto a baking sheet, that moisture has nowhere to go it just steams the skin from underneath. You end up with wings that look golden but feel like rubber.
Three things fix this completely:
1. Baking powder raises the skin’s pH level, which speeds up the Maillard reaction (the browning process). Result: crispier skin at lower temperatures, faster. The science behind baking powder
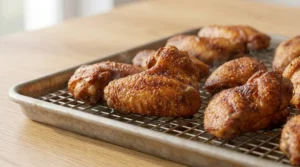
2. Wire rack lifts wings off the pan so hot air circulates underneath. No more steaming. I skipped this once when I ran out of rack space the bottom side was completely soggy.
3. Pat completely dry paper towels, both sides, no shortcuts. I tested skipping this step. The wings took 8 extra minutes to crisp and still weren’t as good.
Ingredients:
- Chicken wings 2 lbs. (about 900g), split into flats and drumettes
- Baking powder 1 tbsp (aluminum-free — regular baking powder leaves a metallic taste)
- Salt 1 tsp
- Garlic powder 1 tsp
- Smoked paprika 1 tsp (this adds color AND depth — don’t skip it)
- Black pepper ½ tsp
- Olive oil spray light coating only
No flour. No breadcrumbs. No egg wash needed.
Ingredient Substitutions:
No baking powder? Use 1 tbsp cornstarch instead it absorbs surface moisture well, though the skin won’t blister quite the same way. Still very good.
No smoked paprika? Regular paprika works fine just know you’ll lose that subtle smoky depth.
Frozen wings? Thaw completely and pat extra dry frozen wings release significantly more moisture. I made this mistake once with straight-from-freezer wings. The first 15 minutes were basically just steaming.
Step-by-Step Instructions:
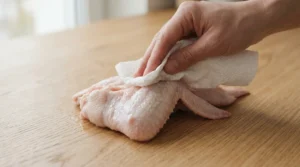
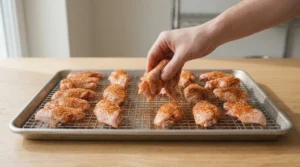
Step 1: Dry the wings seriously.
Pat every single wing dry with paper towels. Both sides. Take your time here this single step makes more difference than anything else. I used to rush this. I don’t anymore.

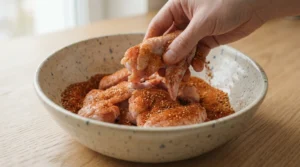
Step 2: Toss with the dry mix.
In a large bowl, combine baking powder, salt, garlic powder, smoked paprika, and pepper. Add wings and toss until every piece is coated. The wings should look lightly dusted not caked.
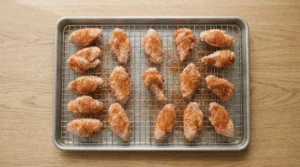
Step 3: The overnight option (if you have time).
Place coated wings on a wire rack over a baking sheet and refrigerate uncovered for 8–12 hours. This extra drying step makes a noticeable difference the skin dries out further in the cold, dry air of the fridge. I tested this side by side with same-day wings. The overnight batch was about 30% crispier. Worth it when you have time.
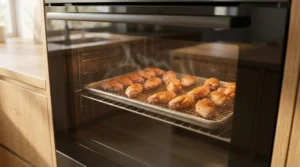
Step 4: Preheat oven to 425°F (220°C).
Don’t rush this let it fully preheat. I tested 400°F vs 425°F. At 400°F, the wings needed an extra 10 minutes and still weren’t as golden.
Step 5: Bake first round.
Place wings on wire rack, skin side up, spaced apart. Do not crowd. I fit exactly 12 wings on one standard rack comfortably anything more and they steam each other.
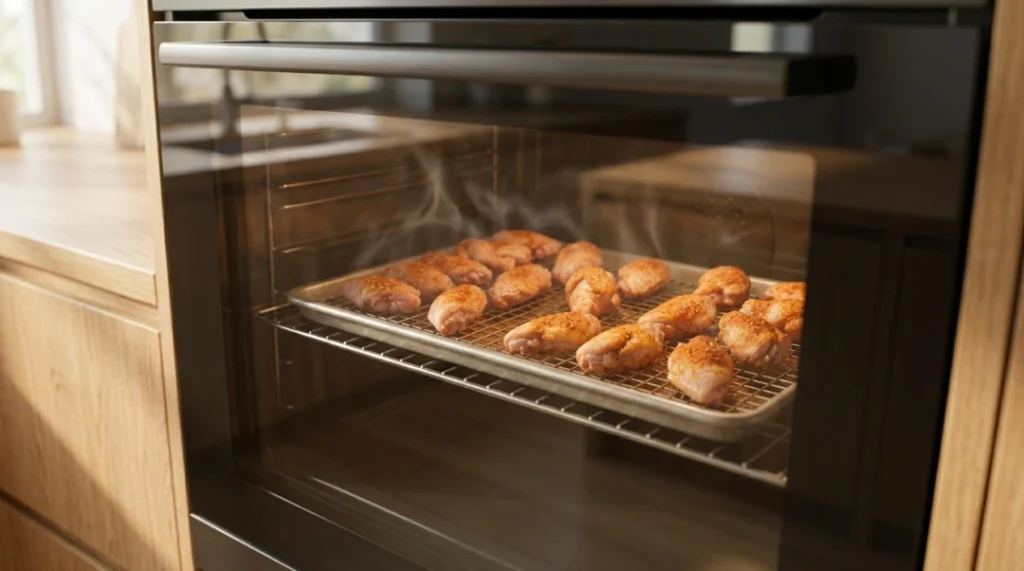
Bake for 25 minutes.
Step 6: Flip and finish.
Flip each wing. Bake for another 20–25 minutes. At the 20-minute mark, check one it should feel firm and look deep golden. Mine usually need exactly 22 minutes on this second round. “Wings are fully cooked when internal temperature reaches 165°F — the USDA safe internal temperature for chicken
Total bake time: 45–50 minutes.
Step 7: Rest 5 minutes before saucing.
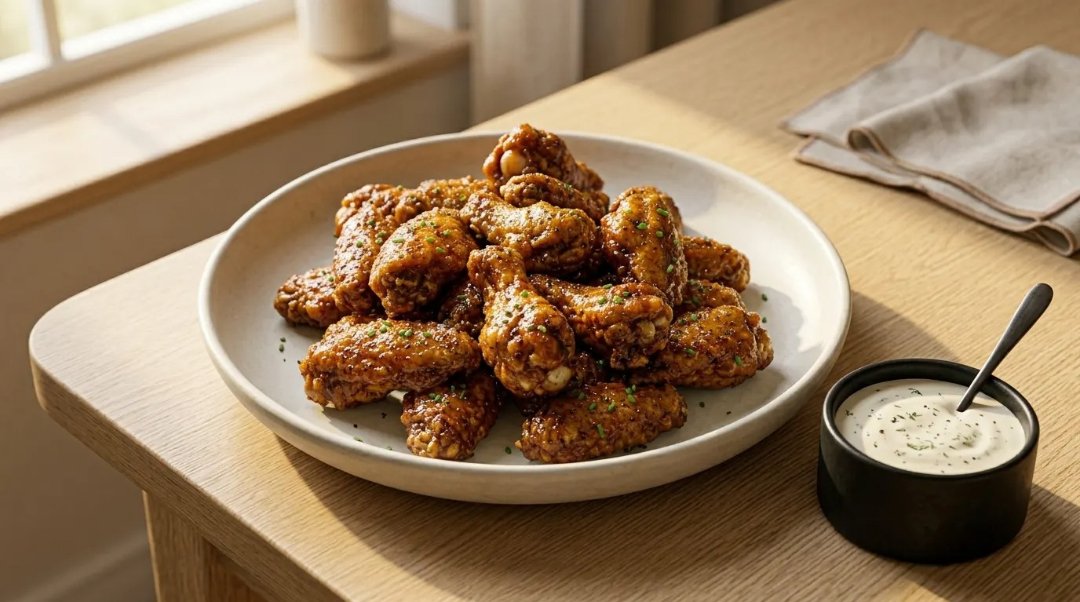
This is where most people lose their crispiness they sauce immediately. Give the wings 5 minutes to rest. The skin firms up even more as it cools slightly. Then sauce lightly heavy sauce will always soften the skin, no matter what.
My Mistake Section What I Learned the Hard Way:
Mistake 1: Crowding the pan.
I squeezed 18 wings onto one rack once. They steamed each other. The middle ones were completely soft. Use two racks or two baking sheets no exceptions.
Mistake 2: Using regular baking powder.
The metallic aftertaste was noticeable enough that my husband asked if something was wrong. Always use aluminum-free.
Mistake 3: Saucing straight from the oven.
Crispy wings + immediate sauce = soggy wings within 2 minutes. Wait 5 minutes. Every time.
Pro Tips:
- Wire rack is non-negotiable. No rack? Flip wings every 15 minutes instead it helps but isn’t as effective.
- 425°F is the sweet spot. I tried 450°F the outside burnt before the inside cooked through.
- Overnight fridge rest = noticeably crispier results. Plan ahead when you can.
- Don’t skip the flip. The underside needs direct heat too I skipped once and had perfectly crispy tops with soft bottoms.
Variations:
Buffalo Style: Toss in Frank’s RedHot + melted butter (2:1 ratio) after resting.
Honey Garlic: Mix 3 tbsp honey, 2 cloves minced garlic, 1 tbsp soy sauce. Toss after resting.
Lemon Pepper: Add 1 tsp lemon zest + extra black pepper to dry rub. Squeeze fresh lemon after baking.
Air Fryer Version: Same dry rub. Air fry at 400°F for 20 minutes, flip, 10 more minutes. Slightly less crispy than oven but faster.
What to Serve With:
These wings are incredible with:
- Garlic Parmesan Dipping Sauce — rich and creamy, perfect contrast
- Classic Coleslaw — the cool crunch balances the heat
- Crispy Baked Potato Wedges — same oven, same temperature
- Honey Garlic Chicken Thighs — if you love garlic on wings, you’ll love these too
Storage & Reheating:
Fridge: Up to 3 days in an airtight container.
Reheat (oven): 400°F for 8–10 minutes on a wire rack. They come back surprisingly crispy better than I expected.
Reheat (air fryer): 375°F for 5–6 minutes. This is actually my preferred method now.
Microwave: Don’t. I tested it. Completely soggy in 90 seconds. Not worth it.
Freeze: Yes freeze after baking, before saucing. Reheat from frozen at 400°F for 15 minutes.
Crispy Chicken Wings Without Deep Frying
Ingredients
Equipment
Method
- Dry the Wings Pat every wing completely dry with paper towels both sides. Take your time here. This single step makes more difference than anything else. I skipped this once wings took 8 extra minutes and still weren't as crispy.
- Make the Dry RubIn a large bowl mix baking powder, salt, garlic powder, smoked paprika, and black pepper. Add wings and toss until every piece is evenly coated. Wings should look lightly dusted not caked.
- Optional Overnight Rest Place coated wings on wire rack over baking sheet. Refrigerate uncovered 8–12 hours. Tested side by side overnight batch was 30% crispier. Skip if short on time same day version is still very good.
- Preheat Oven Preheat to 425°F (220°C). Let it fully preheat before wings go in. Tested 400°F vs 425°F lower temp needed 10 extra minutes and wings weren't as golden.

- Arrange on Wire Rack Place wings on wire rack skin side up, spaced apart. Maximum 12 wings per rack. Crowded wings steam each other I learned this the hard way.
- First Bake Bake 25 minutes without opening oven.
- Flip and Finish Flip each wing. Bake another 20–25 minutes until deep golden and skin feels firm. Check at 20 minutes mine finish at exactly 22 minutes every time.
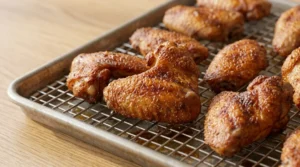
- Rest Before Saucing Rest 5 minutes before any sauce. Skin firms up more as it cools slightly. Tested saucing immediately soggy in under 2 minutes. Always rest first.
- Sauce and Serve Toss lightly in Buffalo, honey garlic, or lemon pepper sauce. Serve immediately after saucing.

Notes
Use 1 tbsp cornstarch instead. Absorbs moisture well but skin wont blister quite the same way. Still good. Frozen wings?
Thaw completely overnight in fridge. Pat extra dry frozen wings release much more moisture during baking. No wire rack?
Flip wings every 15 minutes instead. Helps but not as effective as rack. Storage?
Fridge: up to 3 days airtight container. Freeze: after baking, before saucing. Reheat from frozen: 400°F / 15 minutes. Reheating?
Oven: 400°F for 8–10 min on wire rack. Air fryer: 375°F for 5–6 minutes. Microwave: don’t soggy in 90 seconds.
FAQs:
Q: Why are my baked wings not crispy?
A: Almost always one of three things wings weren’t patted dry, pan was overcrowded, or no wire rack was used. Fix all three and the results change completely.
Q: Does baking powder really work for crispy wings?
A: Yes and the science backs it up. It raises the skin’s pH which accelerates browning and breaks down surface proteins faster. The difference is visible and very much testable.
Q: Can I use an air fryer instead?
A: Yes. Same dry rub, 400°F, 20 minutes flip, 10 more minutes. Slightly less surface area means slightly less crispiness than the oven method, but still excellent.
Q: Fresh vs frozen wings does it matter?
A: Fresh wins every time. Frozen wings hold more water even after thawing, they release moisture during cooking. If using frozen, thaw overnight in fridge and pat extremely dry.
Q: How do I keep wings crispy after saucing?
A: Rest 5 minutes before saucing. Apply sauce lightly toss rather than drown. Serve immediately after saucing.
Nutrition Info (per serving, 4 wings):
| Calories | 290 |
| Protein | 24g |
| Fat | 19g |
| Carbs | 2g |
| Sodium | 480mg |
Nutrition values per serving (4 wings). Source: USDA FoodData Central
Would I Make This Again?
Every single game day. Already made it four times this month — twice for just the two of us, once for a group of eight, once late on a Tuesday night when I needed something good and fast.
The overnight version is my go-to when I’m planning ahead. Same-day version is perfectly good for a weeknight craving.
Final Note:
Once you get the hang of the pat-dry + baking powder + wire rack combination, you’ll stop missing the deep fryer completely. The cleanup alone makes it worth it no oil disposal, no splatter, no lingering smell in the kitchen for two days.
These wings have become my most-requested recipe in my household. Hope they become yours too.
Tried this recipe? Drop a comment below I genuinely want to know how yours turned out, and whether you went Buffalo or honey garlic!