Go Back
A plate of glossy, sauced chicken wings piled high on a minimalist off-white ceramic plate. Beside the plate sits a small black bowl of creamy dipping sauce with a spoon, both placed on a light oak wood table. The scene is illuminated by bright, natural window light to highlight the savory glaze. This professional presentation showcases the perfect appetizer, with every detail designed to make the food stand out and look its absolute best

Crispy Chicken Wings Without Deep Frying

These oven-baked chicken wings come out shatteringly crispy every single time no deep fryer needed. One pantry trick (baking powder) changes everything.
Prep Time 10 minutes
Cook Time 45 minutes
Total Time 1 hour
Servings: 4 servings
Course: Appetizer, Dinner
Cuisine: American
Calories: 290

Ingredients
  

  • 2 lbs Chicken Wings split into flats and drumettes, fresh not frozen
  • 1 tbsp Baking Powder aluminum-free only regular leave metallic taste
  • 1 tsp Salt to taste
  • 1 tsp Garlic Powder
  • 1 tsp Smoked Paprika adds color and depth, dont skip
  • ½ tsp Black Pepper
  • Olive Oil Spray light coating only

Equipment

  • 1 Wire Rack must have — no substitute
  • 1 Baking Sheet rimmed, fits wire rack
  • 1 Large Bowl for tossing wings
  • - Paper Towels for drying wings
  • 1 Tongs for flipping

Method
 

Prep
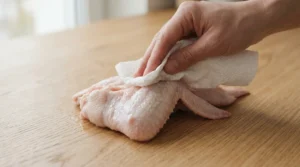
  1. Dry the Wings Pat every wing completely dry with paper towels both sides. Take your time here. This single step makes more difference than anything else. I skipped this once wings took 8 extra minutes and still weren't as crispy.
    A hand uses a white paper towel to dry a raw chicken wing on a plate over a light oak wood table. Bright natural window light fills the background. This clean visual features our strict zero utensil setup to highlight this crucial easy prep step. Removing all moisture from the skin is the best secret for achieving a flawless crunch. This quick trick guarantees the ultimate bite every single time!!
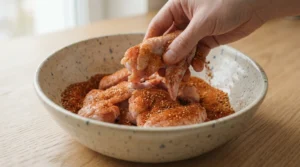
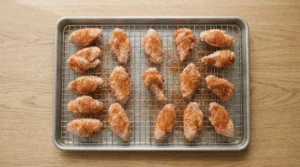
  2. Make the Dry RubIn a large bowl mix baking powder, salt, garlic powder, smoked paprika, and black pepper. Add wings and toss until every piece is evenly coated. Wings should look lightly dusted not caked.
    A hand tosses raw chicken wings in a large speckled ceramic bowl filled with a dry spice rub on a light oak wood table. Bright natural window light illuminates the textures. We bend the strictly zero utensils rule here to clearly show this vital step of coating the wings evenly. The spices create a light, perfect dust for a crispy finish. This simple technique ensures that every single piece is well seasoned
  3. Optional Overnight Rest Place coated wings on wire rack over baking sheet. Refrigerate uncovered 8–12 hours. Tested side by side overnight batch was 30% crispier. Skip if short on time same day version is still very good.
    A hand carefully arranges seasoned chicken wings on a metal wire rack over a baking sheet placed on a light oak wood table. The scene is lit by bright natural window light. We bend the strictly zero utensils rule here to clearly show this vital step of spacing the wings for maximum airflow. Resting them uncovered in the fridge for 8 to 12 hours delivers a 30 percent crispier result for the best bite ever
Bake
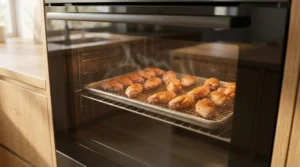
  1. Preheat Oven Preheat to 425°F (220°C). Let it fully preheat before wings go in. Tested 400°F vs 425°F lower temp needed 10 extra minutes and wings weren't as golden.
    The digital display of a modern oven showing 425 degrees Fahrenheit, confirming the perfect temperature for cooking. A tray of seasoned chicken wings sits inside, visible through the glass door. The scene is set in a bright kitchen with a light oak wood counter and natural window light. This setup strictly follows our no utensil rule to keep the focus on professional prep. Achieving this heat is essential for crispiness
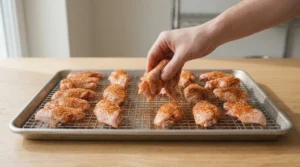
  2. Arrange on Wire Rack Place wings on wire rack skin side up, spaced apart. Maximum 12 wings per rack. Crowded wings steam each other I learned this the hard way.
    op-down view of seasoned chicken wings arranged perfectly on a metal wire rack inside a baking sheet on a light oak wood table. Bright natural window light illuminates the raw wings, which are spaced apart to ensure even cooking. This clean shot follows our zero utensil rule to showcase the ideal setup. Proper spacing prevents steaming and is the essential trick for achieving the most crispy skin possible every single time
  3. First Bake Bake 25 minutes without opening oven.
    Seasoned chicken wings bake on a wire rack within a modern oven. The kitchen features a light oak wood counter and bright natural window light. This setup follows our zero utensil rule to keep the focus on the professional baking process. Keeping the oven door closed for the initial twenty-five minutes is the absolute best way to ensure the wings start to turn golden, creating the ultimate crispiness
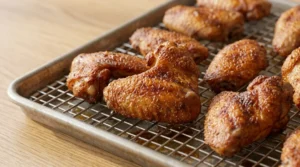
  4. Flip and Finish Flip each wing. Bake another 20–25 minutes until deep golden and skin feels firm. Check at 20 minutes mine finish at exactly 22 minutes every time.
    The final result of perfectly baked chicken wings resting on a wire rack over a baking sheet on a light oak wood table. The wings are deep golden brown and have a firm, crispy skin, captured in bright natural window light. This setup follows our zero utensil rule to showcase the final product clearly. Achieving this level of crispiness through careful flipping is the ultimate secret for the best wings ever
Finish
  1. Rest Before Saucing Rest 5 minutes before any sauce. Skin firms up more as it cools slightly. Tested saucing immediately soggy in under 2 minutes. Always rest first.
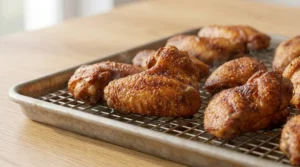
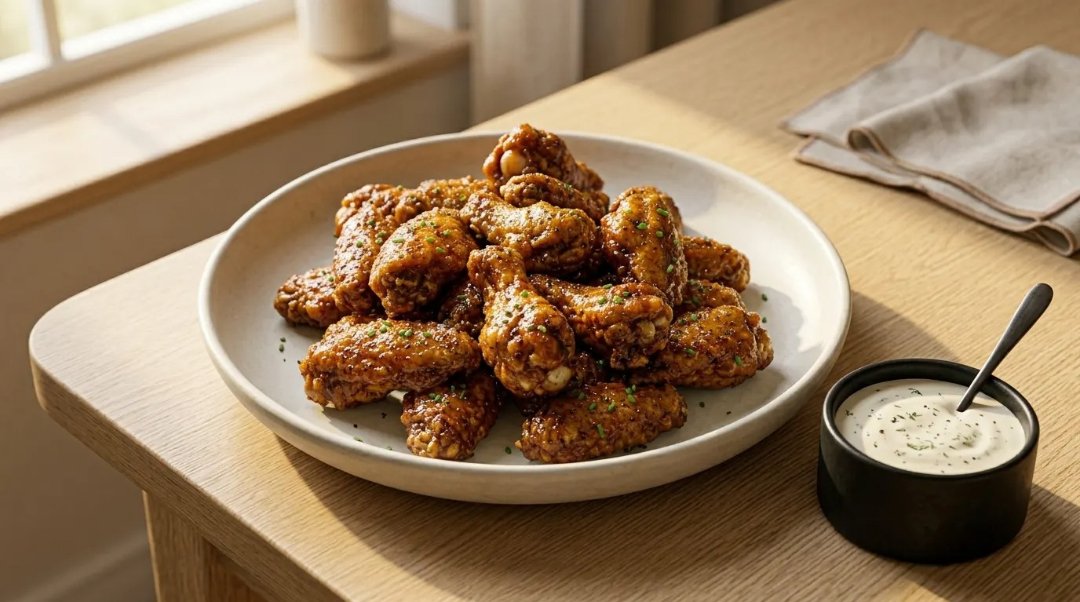
  2. Sauce and Serve Toss lightly in Buffalo, honey garlic, or lemon pepper sauce. Serve immediately after saucing.
    A plate of glossy, sauced chicken wings sits on a light oak wood table, beautifully illuminated by bright natural window light. The wings are coated in a rich honey garlic glaze with a sprinkle of fresh herbs. This presentation follows our style of using high-quality stoneware to make the food stand out, focusing on the appetizing, sticky finish. Serve these immediately for the most delicious bite ever

Notes

 No baking powder?
Use 1 tbsp cornstarch instead. Absorbs moisture well but skin wont blister quite the same way. Still good.
 Frozen wings?
Thaw completely overnight in fridge. Pat extra dry frozen wings release much more moisture during baking.
No wire rack?
Flip wings every 15 minutes instead. Helps but not as effective as rack.
Storage?
Fridge: up to 3 days airtight container. Freeze: after baking, before saucing. Reheat from frozen: 400°F / 15 minutes.
Reheating?
Oven: 400°F for 8–10 min on wire rack. Air fryer: 375°F for 5–6 minutes. Microwave: don't soggy in 90 seconds.